
As a Next.js developer, you may have encountered the frustration of hitting Vercel's "This Serverless Function has timed out" 504 Error. Since Vercel's serverless functions are designed to be used as lightweight backend helpers that respond quickly to clients, they impose execution limits on your api endpoints. On Hobby projects, it's 10 seconds, and on Pro, it's 60 seconds.
Sometimes, you might want to run longer-lived jobs, such as background tasks with your Next.js app. In this blog post, we'll explore a solution to bypass these limitations by deploying your Next.js app on the robust and scalable infrastructure of Google Cloud Platform's (GCP) serverless Could Run service. Cloud Run has a maximum execution time of 60 minutes.
If you don't already have a GCP account, head to the official GCP website (https://cloud.google.com/) and sign up for a new account. You may be eligible for a free trial with some initial credits to explore the platform's services.
Once you have your GCP account, create a new project by navigating to the GCP Console (https://console.cloud.google.com/) and clicking on the "Select a Project" dropdown. Choose "New Project," provide a name and a unique ID, and select the organization if applicable. After that, click "Create" to set up your new project.
Before proceeding, ensure that billing is enabled for your GCP project. Go to the GCP Console, open the "Navigation Menu," and choose "Billing." Here, you can link a billing account or set up a new one to avoid interruptions in your services.
To interact with GCP services, you'll need to install the Google Cloud SDK on your local machine. Follow the installation instructions provided by Google for your operating system (https://cloud.google.com/sdk/docs/install). Then, authenticate with your GCP account using the command-line tool:
gcloud auth login
Google Cloud Run, a serverless platform, allows you to deploy containerized applications. To do this, you'll need to create a Docker image for your Next.js app. First, install Docker on your machine. This will allow you to build and run Docker images locally so you can test whether the app builds and runs on Docker before pushing it up to GCP.
To add support for Docker to an existing project, add the following to the next.config.js file in your Next.js project:
// next.config.js
module.exports = {
  // ... rest of the configuration.
  output: 'standalone',
}
This will build the project as a standalone app inside the Docker image. Learn more about deploying Next.js as a Docker image from Vercel's example repo.
In the root directory of your app, create a Dockerfile with the following contents:
#syntax=docker/dockerfile:1.4
FROM node:18-alpine AS base

# Install dependencies only when needed
FROM base AS deps
# Check https://github.com/nodejs/docker-node/tree/b4117f9333da4138b03a546ec926ef50a31506c3#nodealpine to understand why libc6-compat might be needed.
RUN apk add --no-cache libc6-compat python3 make g++
WORKDIR /app

# Install dependencies based on the preferred package manager
COPY --link package.json yarn.lock* package-lock.json* pnpm-lock.yaml* ./
RUN \
  if [ -f yarn.lock ]; then yarn --frozen-lockfile; \
  elif [ -f package-lock.json ]; then npm ci; \
  elif [ -f pnpm-lock.yaml ]; then yarn global add pnpm && pnpm i --frozen-lockfile; \
  else echo "Lockfile not found." && exit 1; \
  fi


# Rebuild the source code only when needed
FROM base AS builder
WORKDIR /app
COPY --from=deps --link /app/node_modules ./node_modules
COPY --link  . .

# Next.js collects completely anonymous telemetry data about general usage.
# Learn more here: https://nextjs.org/telemetry
# Uncomment the following line in case you want to disable telemetry during the build.
# ENV NEXT_TELEMETRY_DISABLED 1

RUN yarn build

# If using npm comment out above and use below instead
# RUN npm run build

# Production image, copy all the files and run next
FROM base AS runner
WORKDIR /app

ENV NODE_ENV production
# Uncomment the following line in case you want to disable telemetry during runtime.
# ENV NEXT_TELEMETRY_DISABLED 1

RUN \
  addgroup --system --gid 1001 nodejs; \
  adduser --system --uid 1001 nextjs

COPY --from=builder --link /app/public ./public

# Automatically leverage output traces to reduce image size
# https://nextjs.org/docs/advanced-features/output-file-tracing
COPY --from=builder --link --chown=1001:1001 /app/.next/standalone ./
COPY --from=builder --link --chown=1001:1001 /app/.next/static ./.next/static

USER nextjs

EXPOSE 3000

ENV PORT 3000
ENV HOSTNAME localhost

CMD ["node", "server.js"]
Now, build the Docker image locally by executing the following commands in the same directory as the Dockerfile:
docker build --platform=linux/amd64 -t your-image-name .
Make sure to replace "your-image-name" with a suitable name for your Docker image. GCP Cloud Build likely takes more time than your local machine, so we want to first build locally to make sure it builds without encountering errors.
Test running the app from your Docker image locally by running this command:
docker run -p 3000:3000 your-image-name
Make sure you are not already running the app locally on port 3000, as this will need to use port 3000 to display your app running inside Docker to http://localhost:3000.
With the Docker image successfully built, we can now build your container image using Cloud Build.
gcloud builds submit --tag gcr.io/your-project-id/your-image-name --project project-id
Make sure to replace "your-image-name" and "your-project-id" with the correct values.
Once the image has been built, we can now deploy the image to Google Cloud Run. You'll be prompted to choose a region for deployment. Select the region closest to your target audience for better performance. You will also be prompted to allow unauthenticated invocations: respond with y.
gcloud run deploy \
--image gcr.io/your-project-id/your-image-name \
--project your-project-id \
--platform managed \
--update-env-vars KEY1=VALUE1,KEY2=VALUE2
Make sure to replace "your-image-name" and "your-project-id" with the correct values. In addition, if you have environment variables, update the list of key-value pairs.
If you want to use the same environment variables inside an .env.local file, this version will append the key value pairs from the .env.local file to the --update-env-vars argument:
gcloud run deploy \
--image gcr.io/your-project-id/your-image-name \
--project your-project-id \
--platform managed \
--update-env-vars "$(grep -vE '^\s*(#|$)' .env.local | awk -F= '{printf "%s=%s,", $1, $2}' | sed 's/,$//')"
If there are variables in the .env.local file you don't want to be used on GCP, you can always create a new file with the appropriate environment variables (for example .env.gcp) and substitute that in place of .env.local.
After a successful deployment, you'll receive a URL. Simply visit this URL in your web browser to verify that your app is running correctly. It will have a structure like this: https://[name]-[build-slug]-[region-slug].a.run.app
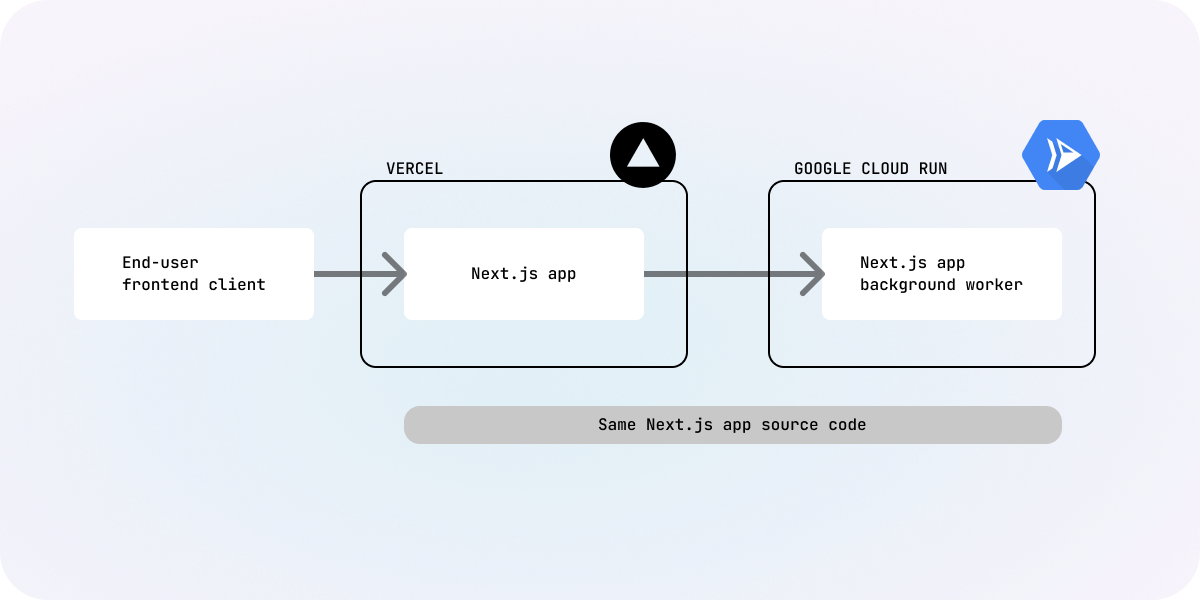
In your Next.js app hosted on Vercel, you can now call the Cloud Run instance for tasks that require more than 60 seconds to execute. Initiate the task by calling the API route with Cloud Run host instead of the Vercel host, like so:
await new Promise((resolve) => {
    setTimeout(() => {
      resolve(fetch(`${cloudRunUrl}/api/background-job-endpoint`));
    }, 100);
  });
Be sure to replace /api/background-job-endpoint with the path to the API route you want to call. The background job might take a while to process, so we don't wait for the response before resolving the promise. Typically, the API route handler will update the state of a database so you can listen to the outcome of the job asynchronously.
You could call this from your frontend or we recommend calling it from a backend API route so as to not expose the Cloud Run URL directly to the public.
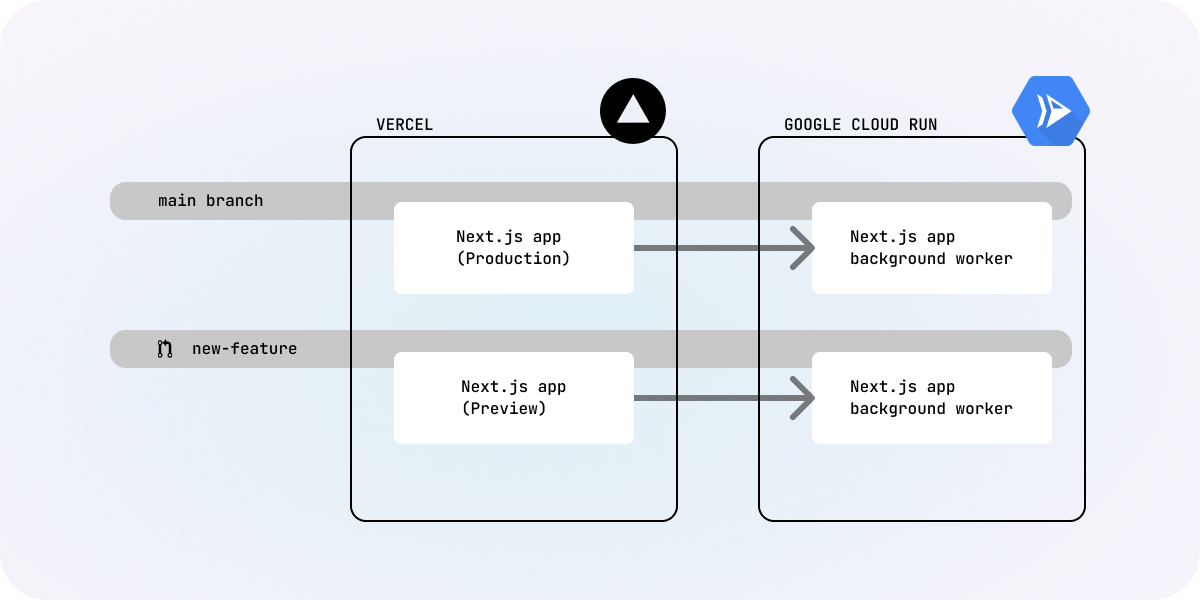
You might want to add GCP Cloud Build triggers to automatically build Docker containers whenever code is pushed to any branch. This will enable continuous integration and ensure that your Next.js app is always up-to-date and ready for deployment.
Since each branch will have its own version of Cloud Run, this allows Vercel previews deployed from pull requests to call its corresponding Cloud Run background jobs deployed with the same code changes.
Copy and save the below cloudbuild.yaml template to the root of your GitHub repository. Make sure you substitute your-image-name with the name of your Docker image and service-name with the name of your Cloud Run service. Replace your-region with the same region as above. Note that you can leave $PROJECT_ID as is, since it is automatically replaced for you by Cloud Build.
steps:
# Build the container image
- name: 'gcr.io/cloud-builders/docker'
  args: ['build', '-t', 'gcr.io/$PROJECT_ID/your-image-name:$COMMIT_SHA', '.']


# Push the container image to Container Registry
- name: 'gcr.io/cloud-builders/docker'
  args: ['push', 'gcr.io/$PROJECT_ID/your-image-name:$COMMIT_SHA']


# Deploy container image to Cloud Run
- name: 'gcr.io/google.com/cloudsdktool/cloud-sdk'
  entrypoint: gcloud
  args: ['run', 'deploy', 'service-name', '--image', 'gcr.io/$PROJECT_ID/your-image-name:$COMMIT_SHA', '--region', 'your-region', '--tag', '$BRANCH_NAME']
images:
- gcr.io/$PROJECT_ID/your-image-name:$COMMIT_SHA
Note that we tag each Cloud Run deploy with $BRANCH_NAME so that each branch has a corresponding tag on the Cloud Run service, and the latest commits from each branch overwrite the service tagged with $BRANCH_NAME.
Now, we'll set up the Cloud Build trigger that will automatically build and deploy the app on every GitHub push.
Since we are no longer deploying the Cloud Run service directly with environment variables from the gcloud CLI, we need to set up environment variables in Google Secrets Manager with these steps:
We want to make sure that the version of the app hosted on Vercel can access its corresponding version hosted on Cloud Run. This is useful especially for Vercel previews that are generated from pull requests on different branches of the GitHub repo. Since we've tagged the Cloud Run service with the branch name, you can simply call the Cloud Run URL with the tag prefix, like so:
const branchName = process.env. VERCEL_GIT_COMMIT_REF;
fetch(`https://${branchName}---${cloudRunServiceIdentifier}.run.app/api/endpoint...`);
Within Vercel, you can access the branch name from the environment variable VERCEL_GIT_COMMIT_REF
Now that the Cloud Build trigger is set up, let's test it to ensure it deploys the app correctly on every GitHub push.
cloudbuild.yaml configuration. At the same time, Vercel will start building a preview deployment.Once the build and deployment process is complete, verify that the app is deployed to Cloud Run:
After the Cloud Run app has been deployed, you can now test whether the Preview app on Vercel can access the Cloud Run service with the correct tag. Call an API route that calls the Cloud Run URL and see if it's able to kick off a request successfully by checking the logs in the Cloud Run dashboard inside the GCP console.
Now that we have taken the first step towards deploying your Next.js app on Google Cloud Run to run background tasks, you can consider enhancing your workflow with the following next steps:
With Webrunner, you can leave all the complexities of implementing and managing Next.js background tasks behind. Webrunner seamlessly handles the entire process for you, from continuous integration to task queuing – it's all taken care of with a few clicks.
Learn more at www.webrunner.io or contact us at hello@webrunner.io
Questions, comments and feeback? I'd be happy to hear from you! Please email us at developers@webrunner.io.